Implementing Master-Master Row-Level Synchronization Using SQL Server
Version 1.0.0 GotDotNet community for collaboration on this pattern Complete List of patterns & practices
Context You want to build a master-master synchronization between two Microsoft SQL Server databases, and you want to take advantage of the integrated synchronization functionality of SQL Server. The replication sets of the source and target are identical and manipulations of them are not intended. You want to detect and resolve potential conflicts at the row level. In addition, you want to be able to define the conflict resolution method according to your business needs (for example, the more recent change wins).
Background Before introducing the implementation with SQL Server, this pattern covers the following topics: Synchronization Building Block
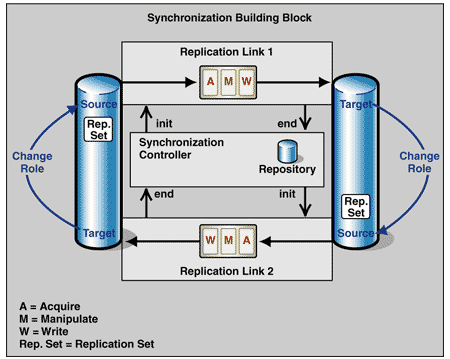
The Master-Master Row-Level Synchronization design pattern uses a synchronization building block, which consists of two related replication links and a synchronization controller. Figure 1 shows Master-Master Row-Level Synchronization at the design level with the related replication links.
Synchronization Controller
The synchronization controller manages the synchronization. It relates both replication links and controls their invocations. The controller uses its own repository to store information about the synchronization, for example the time of the last synchronization for the replication link pair.
Source
The source contains the replication set, which is the data to be copied from the source and sent across a data movement link to the target.
Acquire
In the Master-Master Row-Level Synchronization pattern, the controller invokes the Acquire service. The Acquire service reads the data changes to be transmitted.
Manipulate
The Manipulate service performs simple data transformations, such as data type conversions and splitting or combining columns.
Write
The Write service updates the target with the manipulated rows. Before writing the updates, the Write service uses conflict detection and resolution methods to merge any data modifications that occurred after the last synchronization on both source and target.
Target
The Target is the database where the replication set is to be written.
SQL Server Replication Services
This section describes the types of replication available in SQL Server and the replication components used in this pattern.
Replication Types
SQL Server offers two types of replication that cope with updates to both source and target:
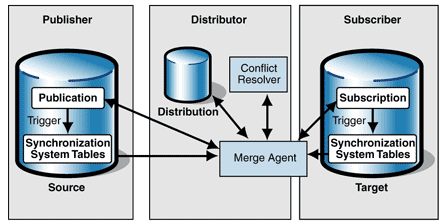
SQL Server merge replication uses several standard services to synchronize data between the publication database and the subscription database. Figure 2 shows the services and processes involved in such a transmission.
Platform Roles
SQL Server defines three roles for the platforms that are involved in synchronization:
The Distributor does not necessarily need to be a separate platform. Its role can also be assigned to the Publisher, where it is called a local Distributor. Otherwise it is called a remote Distributor.
Software Components
SQL Server replication contains the following software components:
In a merge replication with row-level conflict detection, there are three alternatives for the data flow:
Alternatively, you can use a user-written conflict resolver, which is implemented as stored procedures, or a COM conflict resolver.
Mapping the Synchronization Building Block to SQL Server
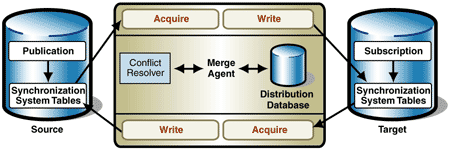
Figure 3 shows how the elements of the synchronization building block map to those of SQL Server merge replication.
Defining the Replication Set
The replication set that is to be synchronized between the source and the target in SQL Server is called a publication on the Publisher and a subscription on the Subscriber. The elements of a subscription are identical to those of a publication. This kind of publication consists of one or more tables, or only parts of tables. The parts of tables can be defined in one or two ways by:
Synchronization Controller
In the SQL-Server environment, the Merge Agent takes the role of the synchronization controller. The Merge Agent executes Replication Link 1 to upload changes from the Publisher, and then executes Replication Link 2 to download the Subscriber updates.
Source
The source is the publication database, which contains the publication to be replicated and the synchronization system tables.
Acquire
The changes on the replication set are tracked by triggers and are written to local system tables. These changes are then acquired by the Merge Agent.
Manipulate
In a merge replication environment, data manipulations within the transmission are not permitted.
Write
The replication set is written to the target by the Merge Agent, which detects and resolves conflicts before it writes the data.
Target
The target is the Subscription database, which contains the corresponding replication set to the source.
Implementation Strategy The schemas of the publications in both Publisher and Subscriber must be identical. SQL Server merge replication does not support any manipulations during transmissions. To set up a new replication link
1.Configure the Distributor:
2.Define the publication:
3.Define the subscription:
At this point, all elements of the replication link have been configured. From now on, both Publisher and Subscriber will log all changes to the specified replication set using triggers.
The SQL Server merge replication runs different jobs:
The example that follows describes in detail how to use the SQL Server wizards to set up this kind of replication link.
Example This example describes a synchronization performed with SQL Server merge replication. The synchronization uses a table from the Pubs sample database, which is delivered with SQL Server. Overview
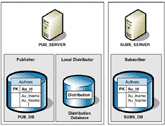
This example uses two computers to demonstrate the synchronization. One computer, PUB_SERVER, hosts the Publisher, including the database PUB_DB, and a local Distributor, including the default Distribution database, Distribution. Another computer, SUBS_SERVER, forms the subscriber and has a database identical to PUB_DB named SUBS_DB. An initial snapshot is used to transmit the data schema and populate the tables on the Subscription database. Figure 4 shows the architecture of the example.
The conflict resolution mechanism used is an integrated custom Microsoft SQL Server DATETIME (Earlier Wins) Conflict Resolver. Each table in the replication set therefore needs a special column of type DATETIME. This column must be updated each time a row is modified. The following triggers perform this task:
CREATE TRIGGER authors_inserted ON dbo.authors
AFTER INSERT, UPDATE
AS
UPDATE dbo.authors
SET last_changed = getdate()
WHERE au_id = inserted.au_id;

CREATE TRIGGER authors_deleted ON dbo.authors
BEFORE DELETE
AS
UPDATE dbo.authors
SET last_changed = getdate()
WHERE au_id = deleted.au_id;
The triggers were created on the Subscription database when the initial snapshot was applied. If you don't use an initial snapshot, you have to create the triggers yourself that correspond to the Publication database. The subscriber initiates the synchronization process every 15 minutes. Publication and Subscription have identical data structures. Configuring the Publisher and the Distributor
To set up the example environment, follow these steps in the Configure Publishing and Distribution Wizard.
1.In SQL Server Enterprise Manager, select the publication database server, right-click Replication, and then click Configure Publishing, Subscribers and Distribution.
2.On the Select Distributor page, select Make Pub_Server its own Distributor, where Pub_Server is the name of the server you want to configure as a Distributor. Click Next.
3.On the Specify Snapshot Folder page, type the name of a shared folder on the Distributor where the Snapshot Agent can store snapshot files.
4.On the Customize the Configuration page, select No, use the following default settings to create a default distribution database.
Creating a Publication
Next, use the Create Publication Wizard to create a publication on the Publisher.
1.In SQL Server Enterprise Manager, select the publication database server, expand Replication, right-click Publications, and then click New Publication.
2.On the Welcome Screen, click Next.
3.On the Choose Publication Database page, select Pub_DBas the Publication Database, where Pub_DB is the name of your publication database for the replication.
4.On the Select Publication Type page, select Merge Publication to create a publication for the synchronization.
5.On the Specify Subscriber Types page, select only Servers running SQL Server 2000.
6.The Specify Articles page shows possible objects for replication in the Publication Database. From the Object Type Tables list, select the authors table. Click the ellipses ( ... ) button to specify the properties for this article.
7.On the Table Article Properties page, specify the type of conflict detection and select a resolver:
Figure 5 shows the General and Resolver tabs of the Table Articles Properties page.
8.The Article Issues page informs you that each table of the publication needs a unique identifier column with the data type ROWGUIDCOL. If this column does not exist, it is created automatically. Click Next to proceed.
9.On the Select Publication Name and Description page, specify the Publication name as example. The default entry for the publication description can be used.
10.On the Customize the Properties of the Publication page, select the option beginning with No, create the publication as specified to accept the default options shown in the text box below the options.
11.On the Completing the Create Publication Wizard page, click Finish to create the publication.
Creating a Subscription
To complete the configuration, use the Pull Subscription Wizard to create a pull subscription for the defined publication on the Subscriber.
1.In SQL Server Enterprise Manager, select the subscription database server, open Replication, right-click Subscriptions, and then click New Pull Subscription.
2.On the Welcome Screen, click Next.
3.On the Look for Publications page, select Look at publications from registered servers.
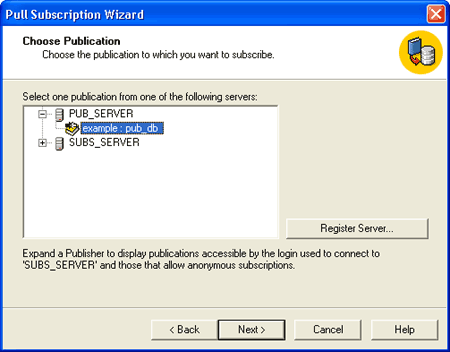
4.On the Choose Publication page, expand Pub_Server and select the Publication named example:pub_db, where Pub_Server is the name of your Publisher and example:pub_db is the name of your publication (see Figure 6).
5.On the Specify Synchronization Agent Login page, select Use SQL Server Authentication. Enter the login and the password of a user account that is used to connect to the Publisher during the replication.
6.On the Choose Destination Database page, select Subs_DB as the database for the Subscription, where Subs_DB is the name of your subscription database.
7.On the Initialize Subscription page, select Yes, initialize the schema and the data, and then click Start the Merge Agent to initialize the Subscription immediately to use a snapshot from the Publication database to create an identical author table on the Subscription database.
8.On the Snapshot Delivery page, specify the snapshot folder. This example uses the default folder of the publication.
9.On the Set Distribution AgentSchedule page, select Using the following schedule, and then click Change to specify a new schedule for the Distribution Agent.
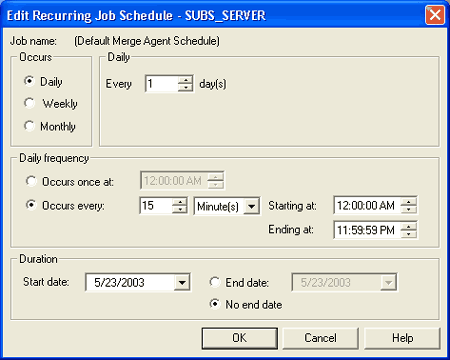
10.On the Edit Recurring Job Schedule page, under Occurs, select Daily. Under Daily Frequency, select Occurs every and specify an interval of 15 minutes. (See Figure 7.)
11.On the Set Subscription Priority page, select Use the Publisher as a proxy (the example does not use a priority-based conflict resolver).
12.The Start Required Services page shows the status of the SQL Server Agent on the Subscriber. If the SQL Server Agent is not running, select the check box next to the entry for the Agent. The Agent will start after the wizard creates the subscription.
13.On the Completing the Pull Subscription Wizard page, review the options for the specified subscription. Click Finish to create the subscription with these options.
The configuration process is finished. During this process, the system tables and triggers for the merge replication are installed on the Publisher and the Subscriber. The initial snapshot is applied, and now every change on the replication set is logged in both databases.
Before starting the first transmission, you should check the following:
Starting and Restarting the Synchronization
To start the synchronization manually, follow these steps:
1.In SQL Server Enterprise Manager, select the publication database server, open Replication Monitor, select Publishers, Pub_Server, and open the publication example:pub_db.
2.Right-click SnapshotAgent and select Start Agent to create an initial snapshot.
3.Right-click SUBS_Server:subs_db and select Start Synchronizing to start the synchronization.
The replication usually runs on a defined schedule. If you want to test the replication or start the merge replication immediately, however, you need to start the replication manually.
Testing the Example
You can easily test the functionality of the implemented synchronization by changing data in the publication database and the subscription database, starting the synchronization, and checking to see if the corresponding data has changed accordingly.
To check various kinds of data changes, perform INSERT, UPDATE, and DELETE operations on the publication database and the subscription database. The updates should involve the same rows in both databases. Manipulate the data so that different conflicts occur and so that both databases include winning rows, as follows:
1.Change a row in the publication database. For example:
UPDATE authors SET au_lname = 'Smith' WHERE au_id = '807-91-6654'

INSERT INTO authors (au_id, au_lname, au_fname, phone, contract)
       VALUES ('453102-3255', 'Berg', 'Karen', '400 486-234', 1)

DELETE FROM authors WHERE au_id = '672-71-3249'
2.Change the corresponding row in the subscription database so that a conflict occurs. For example:
UPDATE authors SET au_lname = 'Meyer' WHERE author_id = '807-91-6654'
3.Start the synchronization manually.
4.Check to see if the rows changed in both databases. Verify that the expected column won the conflict that occurred during the transmission. For example:
SELECT * FROM authors
5.Check the history of the subscription in the replication monitor to make sure that the conflict was logged as detected and resolved.
Resulting Context The implementation described in this pattern detects and resolves conflicts at the row level. Updates on different columns of the same row are treated as conflicts, and only the source changes or the target changes will remain after a transmission. The implementation of the Master-Master Row-Level Synchronization pattern has the same benefits and liabilities as the design pattern. In addition, the use of this pattern results in the following benefits and liabilities: Benefits
Liabilities
Testing Considerations After you set up the merge replication as described in this pattern, you must test it thoroughly. Your test cases should cover these scenarios and others:
After each test, make sure that the data at both ends of the replication is consistent.
Finally, put the highest expected load on both the publication database and the subscription database and check to see if the synchronization still runs correctly.
Security Considerations To secure the connection between the Distributor and the Subscribers, do one of the following:
If you prefer a security approach that is independent of the operating system, you should use SQL Server authentication.
Operational Considerations The SQL Server Agent manages the different jobs of the replication. Schedules for these jobs were defined during the configuration. Additionally, you can start each job manually using the SQL Server Enterprise Manager. The Replication Monitor in SQL Server Enterprise Manager provides the following information:
If the replication fails, do the following:
Related Patterns For more information, see the following related patterns. Patterns That May Have Led You Here
Other Patterns of Interest
|
