Implementing Master-Slave Snapshot Replication Using SQL Server
Version 1.0.0 GotDotNet community for collaboration on this pattern Complete List of patterns & practices
Context You want to implement the design pattern Master-Slave Snapshot Replication. You are replicating between two Microsoft SQL Server databases, and you want to take advantage of the integrated functionality of SQL Server. The replication set consists of entire rows, not just changes that have occurred to rows since the last replication. Any changes to the replication data at the target that may have occurred since the last transmission will be overwritten by a new transmission.
Background Before introducing the implementation with SQL Server, this pattern covers the following topics: Replication Building Block
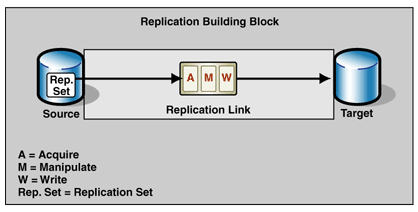
The replication building block used in the Master-Slave Snapshot Replication pattern consists of a source and a target that are connected by a replication link, as Figure 1 shows.
Source
The source contains the replication set, which is the data to be copied from the source and sent across a data movement link to the target.
Acquire
The Acquire service reads the rows to be replicated.
Manipulate
The Manipulate service performs simple data transformations, such as data type conversions and splitting or combining columns.
Write
The Write service updates the target with the manipulated rows.
Target
The target is the database where the replication set is to be written.
Moving the replication set from source to target according to defined functional and operational requirements is called a transmission.
SQL Server Snapshot Replication
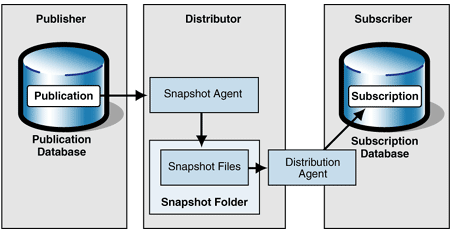
SQL Server replication uses several standard services to move data from a publication database to a subscription database. Figure 2 shows the services and processes involved in SQL Server snapshot replication.
Platform Roles
SQL Server defines three roles for the platforms involved in the replication:
The Distributor does not necessarily need to be a separate platform. Its role can also be assigned to the Publisher, where it is called a local Distributor. Otherwise, it is called a remote Distributor.
Software Components
SQL Server snapshot replication contains two processes:
Independent of the replication processes, cleanup jobs run on the distribution database and perform the following tasks:
Mapping the Replication Building Block to SQL Server
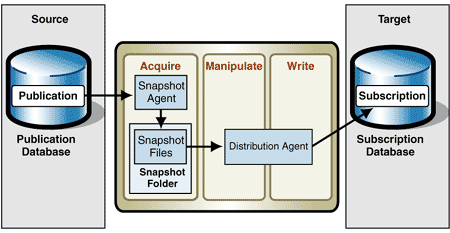
Figure 3 shows how the elements of the replication building block correspond to those of a SQL Server snapshot replication.
Source
The source is the publication database that contains the publication to be replicated and takes on the role of the Publisher.
Replication Set
In SQL Server, the replication set to be transmitted from the Publisher to the Subscriber is called a publication. A publication consists of one or more tables, or only parts of tables. Parts of tables can be defined by:
In the theory of relational databases, the result is called a restriction. In the theory of relational databases, the result is called a projection. Acquire
The Snapshot Agent reads all of the data from the defined publication into snapshot files and stores them in a shared snapshot folder.
Manipulate
The Distribution Agent can manipulate data before the data is written to the target. When the target registers its subscription to the Distributor, it can define a DTS package that the Distributor will call before sending the data to the Subscriber. Each Subscriber can use its own package; different Subscribers can get various views of the same data.
Within a DTS package, you can define any manipulations using the data of the current row and the possibilities of an ActiveX script language. Each row from the source can result in only one row at the target, or it can be skipped. Fields can be split or combined. Additionally, any kind of data type conversions and changes of field names can be done.
Write
The Distribution Agent writes the contents of the snapshot file to the target. The agent reads the snapshot file from the shared snapshot folder and applies the schema and the data to the target. Name conflicts during the write can be resolved in different ways. The default option in a snapshot replication is to drop the existing table and recreate it from the snapshot file. Another option is to leave the table on the target unchanged and reject the relevant data in the snapshot file. The last option is to delete the data on the target and use the empty table to write only the data from the snapshot file. In the case of using the existing table, the schema information from the snapshot file is not needed.
Target
The target is the subscription database, where the transmitted and possibly manipulated replication set is written. The target takes on the role of the Subscriber.
Implementation Strategy To set up a new replication link, follow these steps:
1.Configure the Distributor:
2.Define the publication:
3.Create a DTS package for the transformation, if you have decided to use one.
4.Define the subscription:
At this point, all elements of the replication link have been configured. From now on, both the publication database and the subscription database will log all changes to the specified replication set using triggers.
The SQL Server snapshot replication runs different jobs:
The example that follows describes in detail how to use the SQL Server wizards to set up such a replication link.
Example This example shows how to configure snapshot replication based on a particular replication set. The replication set used here is the authors table from the pubs sample database, which is delivered with SQL Server. Overview
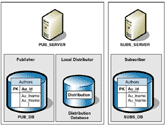
The environment has two SQL Server computers: PUB_SERVER and SUBS_SERVER. The Publisher has a database, PUB_DB, that contains the authors table from the pubs sample database. The Subscriber has an empty database, SUBS_DB. (See Figure 4.)
The introduced configuration describes a snapshot replication using pull subscription where the Subscriber initiates the replication every two hours. The data from the Publisher will be manipulated during the replication. The first and the last name from the authors table will be converted to uppercase.
Configuring the Publisher and the Distributor
To set up the example environment, follow these steps in the Configure Publishing and Distribution Wizard.
1.In SQL Server Enterprise Manager, select the publication database server, right-click Replication, and then click Configure Publishing, Subscribers and Distribution.
2.On the Select Distributor page, select Make Pub_Server its own Distributor, where Pub_Server is the name of the server you want to configure as a Distributor. Click Next.
3.On the Specify Snapshot Folder page, type the name of a shared folder on the Distributor where the Snapshot Agent can store snapshot files.
4.On the Customize the Configuration page, select No, use the following default settings to create a default distribution database.
Creating a Publication
Next, use the Create Publication Wizard to create a publication on the Publisher.
1.In SQL Server Enterprise Manager, select the publication database server, expand Replication, right-click Publications, and then click New Publication.
2.On the Welcome Screen, check the Show advanced options check box to use this wizard with the advanced options needed to enable a transformation of the data.
3.On the Choose Publication Database page, select Pub_DBas the publication database, where Pub_DB is the name of your database for the replication.
4.On the Select Publication Type page, select Snapshot Publication to create a publication for a snapshot replication.
5.You do not want to allow the replication of changes from the subscriber to the publisher; therefore, ensure that no option is selected on the Updateable Subscription page.
6.On the Transform Published Data page, select Yes, transform the data to enable the transformation during the replication.
7.On the Specify Subscriber Types page, select only Servers running SQL Server 2000.
8.The Specify Articles page shows possible objects for replication in the publication database. From the Object Type Tables list, select the table authors.
9.On the Select Publication Name and Description page, specify the Publication name as example. The default publication description can be used.
10.On the Customize the Properties of the Publication page, select the option beginning with Yes, I will define, because you need a special schedule for the Snapshot Agent.
11.The Filter Data page allows you to specify filters for the data. Since this is not necessary in this example, click Next.
12.On the Allow Anonymous Subscriptions page, select No, allow only named subscriptions to prohibit anonymous access in this example.
13.On the Set Snapshot AgentSchedule page, click Change to specify a new schedule for the Snapshot Agent.
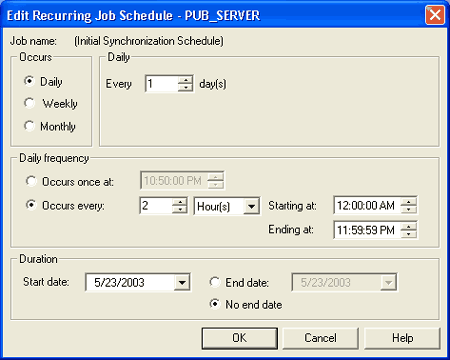
14.On the Edit Recurring Job Schedule page, define the schedule for the Snapshot Agent as a daily run with an interval of two hours. (See Figure 5.)
15.On the Completing the Create Publication Wizard page, review the options for the specified publication. Click Finish to create the publication with these options.
Defining a DTS Package for the Transformation
Before you can create a subscription to the defined publication, you must create a DTS package for the transformation.
1.In SQL Server Enterprise Manager, select the publication database server, expand Replication, open Publications, right-click the example:pub_db replication, and then click Properties.
2.On the Publication Properties page, click the Subscriptions tab, and then click Transformations.
3.On the Welcome Screen, click Next.
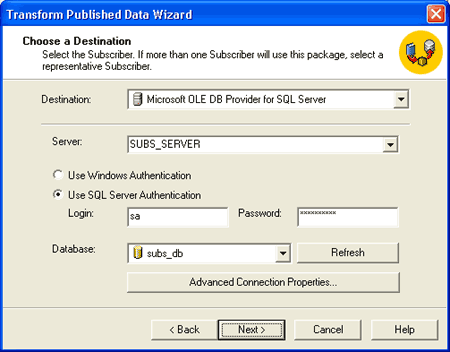
4.On the Choose a Destination page, select the target server and database. (See Figure 6.)
5.On the Define Transformations page, click the ellipses ( ... ) button from the article authors.
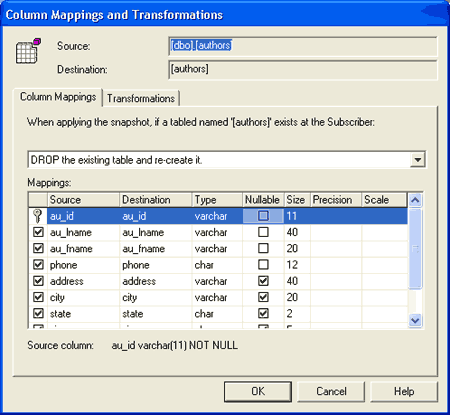
6.On the Column Mappings tab of the Column Mappings and Transformations page, select Drop the existing table and recreate it from the list box. Leave the mappings unchanged. (See Figure 7.)
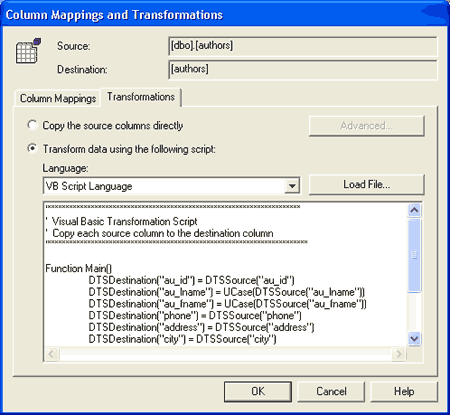
7.Click the Transformations tab. Click Transform data using the following script and select VB Script Language from the list box. (See Figure 8.)
8.Use the following code to transform the first and the last name of the author to uppercase:
Function Main()
   DTSDestination("au_id") = DTSSource("au_id")
   DTSDestination("au_lname") = UCase(DTSSource("au_lname"))
   DTSDestination("au_fname") = UCase(DTSSource("au_fname"))
   DTSDestination("phone") = DTSSource("phone")
   DTSDestination("address") = DTSSource("address")
   DTSDestination("city") = DTSSource("city")
   DTSDestination("state") = DTSSource("state")
   DTSDestination("zip") = DTSSource("zip")
   DTSDestination("contract") = DTSSource("contract")
   Main = DTSTransformStat_OK
End Function
9.On the DTS Package Location page, select the option to save the package on the Distributor. Use the SQL Server authentication option, and insert the user and the password to connect to the Distributor.
10.On the DTS Package Identification page, specify the name of the package. In this example, the name should be transform_sub. You do not need to define an owner password.
11.,On the Completing the Transform Published Data Wizard page, click Finish to save the package as specified.
Creating a Subscription
To complete the configuration, you must create a pull subscription of the defined publication on the target.
1.In SQL Server Enterprise Manager, select the target database server, expand Replication, right-click Subscriptions, and then click New Pull Subscription.
2.On the Welcome Screen, click Next.
3.On the Look for Publications page, select Look at publications from registered servers.
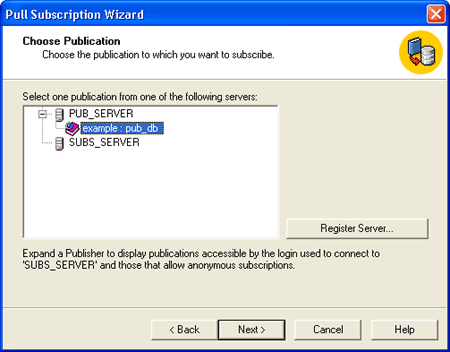
4.On the Choose Publication page, expand PUB_SERVER and select the publication named example:pub_db, where PUB_SERVER is the name of your Publisher and example:pub_db is the name of your publication. (See Figure 9.)
5.On the Specify Synchronization Agent Login page, select Use SQL Server Authentication. Enter the login and the password of a user account that is used to connect to the Publisher during the replication.
6.On the Choose Destination Database page, select Subs_DB as the database for the subscription, where Subs_DB is the name of your target database.
7.On the Initialize Subscription page, the option Yes, initialize the schema and the data cannot be changed because you use a snapshot replication.
8.On the Snapshot Delivery page, specify the snapshot folder. This example uses the default folder of the publication.
9.On the Set Distribution AgentSchedule page, select Using the following schedule and click Change to specify a new schedule for the Distribution Agent.
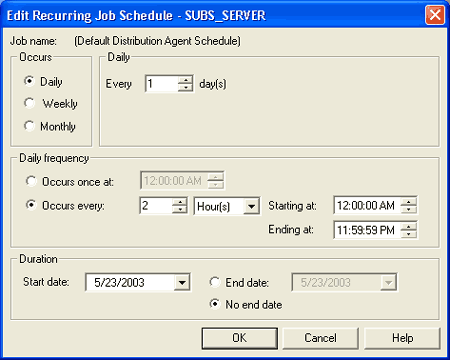
10.On the Edit Recurring Job Schedule page, define the schedule for the Distribution Agent as a daily run with an interval of two hours. (See Figure 10.)
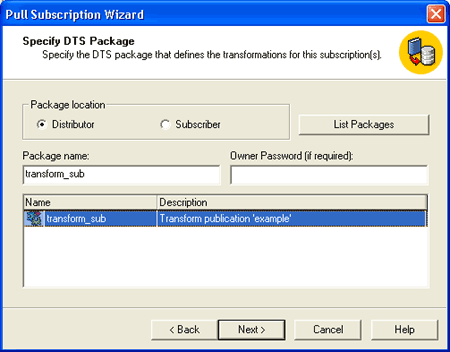
11.On the Specify DTS Package page, select Distributor and click List packages. For the transformation, select the transform_sub package you created previously. (See Figure 11.)
12.The Start Required Services page shows the status of the SQL Server Agent on the Subscriber. If the SQL Server Agent is not running, select the check box next to the entry for the agent. The agent will be started after the wizard creates the subscription.
13.On the Completing the Pull Subscription Wizard page, review the options for the specified subscription. Click Finish to create the subscription with these options.
Starting and Restarting the Snapshot Replication
To start or restart the snapshot replication manually for testing purposes, follow these steps:
1.In SQL Server Enterprise Manager, select the publication database server, open Replication Monitor, select Publishers, Pub_Server, and open the publication example:pub_db.
2.Right-click Snapshot Agent and click Start Agent to create an initial snapshot.
3.Right-click SUBS_Server:subs_db and select Start Synchronizing to start the replication.
The replication usually runs on a defined schedule. If you want to test the replication or start the snapshot replication immediately, however, you need to start the replication manually.
Testing the Example
You can easily test the functionality of the implemented snapshot replication by changing some data in the publication, starting the replication process, and checking to see if the subscription database has changed accordingly.
To check various kinds of data changes, perform INSERT, UPDATE, and DELETE operations on the data in the publication.
1.Change data in the publication. For example:
UPDATE authors SET au_lname = 'Smith' WHERE au_id = '807-91-6654'

INSERT INTO authors (au_id, au_lname, au_fname, phone, contract)
       VALUES ('453-12-3255', 'Smith', 'John', '400 486-234', 1)

DELETE FROM authors WHERE au_id = '672-71-3249'
2.Manually start the replication process.
3.Check to see if the rows changed in the subscription database. For example:
SELECT * FROM authors Resulting Context This implementation has all benefits and liabilities of the Snapshot Replication pattern. This section describes additional benefits and liabilities. Benefits
Liabilities
Testing Considerations After you set up the replication link as described in pattern, you must test it thoroughly. Your test cases should cover the following scenarios at a minimum:
After each test, make sure that the subscription database is in the correct state.
Security Considerations To secure the connection between the Distributor and the Subscribers, do one of the following:
Snapshot data can reside in places other than the source and target data. Use the same security standards for snapshot data that you use for other data in the replication.
Operational Considerations The SQL Server Agent manages the different jobs of the replication. Schedules for these jobs are defined during the configuration. Alternatively, you can start each job manually using the SQL Server Enterprise Manager. The Replication Monitor in SQL Server Enterprise Manager provides the following information:
If the replication fails, do the following:
The connections between the Publisher and its Subscribers must be able to manage the load. If the Publisher sends its data to Subscribers over a slow or expensive communications link, using the republisher model will improve replication. In any case, the Publisher must be connected to remote Distributors by reliable, high-speed communications links.
Related Patterns For more information, see the following related patterns. Patterns that May Have Led You Here
Other Patterns of Interest
|
